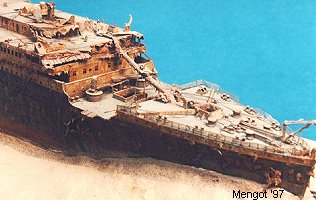
Who says that you can't mess up a model of a wreck? You can mess up ANY model if you don't faithfully reproduce your subject. So it was with Titanic.
 |
First day: Smug. Confident. I've done a lot a research already. I have good skills. I know what I'm doing. What a putz! You haven't been to Woodshole yet! You can't fathom the torturous trek on the endless road into sub-assembly hell that awaits you! Poster child for naivety! You're on a quest, Boy! |
 |
To properly do this model of the wreck requires many skills. I USED my four years of high school drafting, more than everything I ever learned about modeling, computer skills (for the photo-etched parts), technical schematics, research skills, disciplined documentation, polite persistence in landing a research slot at Woodshole, wood working, clay working, and even video working (I have a video log of my effort). The video and computer skills were also useful in creating this web site.
I built a prototype of the model using the little Revell 1/570 scale kit (4-5 months) and this effort helped teach me what I could learn from the published material, and what I didn't know. I researched the wreck at Woodshole Oceanographic Institution (WHOI) during November 1996. Building the final model ran from May 1996 to March 1997.
I drew baseline drawings of what I expected the wreck to look like based on the paintings of the wreck by Ken Marshall (he did his research at Woodshole as well). While the paintings were adequate for the prototype, I wanted photographic evidence for the final model.
The effort is three parts research to one part modeling, and the modeling
is
considerable. But, consider building an accurate model of a 5-acre junk
yard,
and then some yo-yo says, "No, the front of that Chevy in row 8, slot
6 isn't
dented in that way."
Some of the techniques I used were:
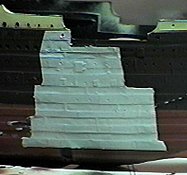
Plastic won't behave like plate steel. Tin foil will.
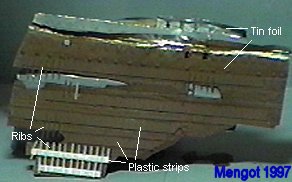 |
2. Prime 3. Cut away the underlying plastic 4. For interiors, inlay plastic strips as stiffening for the tin foil and as a base for adding ribbing. Add ribs and detail. 5. Paint 6. Apply and form to proper shape |
 |
|
 |
I used a simple business card and made a 'rib gauge' with one edge marking ribs on 3 foot centers and the other marking 27" centers. This saved enormous amounts of work in marking the location of ribs, joists, and other deck structures. I used Evergreen strip plastic in every size for ribs, joists, shell plate inlays, and random plating. (Thank God for Evergreen!)
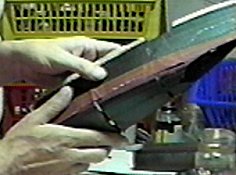
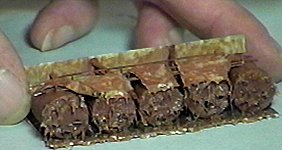
The rusticles are the fingers of rust dangling from the ship's surfaces. They are caused by a bacteria community that draws energy by secreting a compound that dissolves iron and provides food energy to the organism in the process.
 |
2. Apply with a flat toothpick and 'pull' a rusticle. 3. "Tease" to get multi-fingered rusticles. Work fast. In two minutes, the silicon sets up and won't pull any more. Discard and squeeze a new dab. 4. Wait a day and paint with thinned rust paint. |
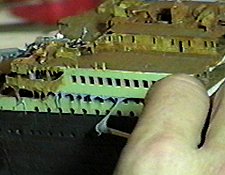
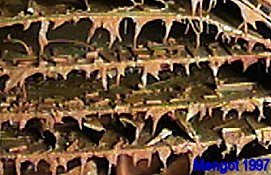
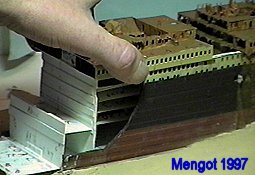
The rivet pattern visible in the super-structure decks is actually the bolts for the wood planks that have been eaten by wood-boring organisms rather than actual rivets. I knew I needed to find a way to do this to really set the model off. The picture shows the final effect but for some reason the lighting put more gray in the deck than is there. This is the port side boat deck. Note the open window in Stateroom 'X' near the expansion joint.
 |
2. Build this up into a jig. 3. Mark the correct spacing of the peg rows 4. Take impressions of the pattern in tin foil 5. Prime and paint 6. Cut to shape and lay on deck surfaces like linoleum |
I learned to use the industrial computer drawing package Autocad. I laid out the parts I wanted (rails, window frames, etc.) and sent the file off to a photo-etch house for fabrication. It's somewhat expensive, but it really sets off the model.
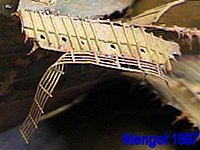 |
The plastic railings in the kit are like brick walls in scale. My custom parts are true to scale and factory specs and look great! In the photo, it does no good to correctly remove the 8th rib by the center porthole, then have a big blob to represent the hanging section of hand rails. (Stern starboard splay) |
The lights in the reception areas of the Grand staircase gained much attention when Dr. Ballard found them in 1986 and both he and James Cameron tend to call them chandeliers. I wanted them in MY reception rooms.
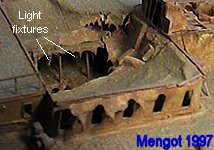 |
Pull a thread of clear plastic sprue. Stick the end in a candle flame and let it glob, shaping it a bit. Paint the wire brown, paint it yellow from behind, and frost the front side. It's a small detail, but adds to the realism of the first class entrance on the A-deck. |
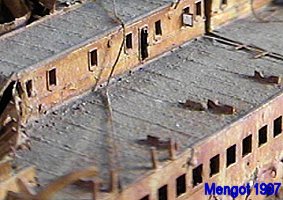
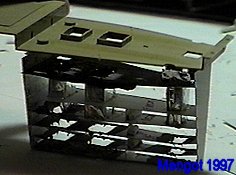
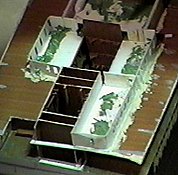
Internal decks have a decisive texture.
 |
The Minicraft kit doesn't stand up well to photographic evidence. The forecastle alone required the fabrication of some 30 parts and the rearrangement of other kit parts to bring it in line with the photos. The raised planking lines, when scraped, serve perfectly for the remaining caulk after the wood deck is dissolved. All other kit decks were discarded. Consult the modeler's guide mentioned above for the details of what needs fixing.
I premixed the paints for the white and black, turning the black to a gray brown rubber color and the white to a tan green puke color often found in Army barracks (add a touch of green and little tan to the white). Testors model master rust #1785 is good for the bottom red color on either the wreck or "as-was" version. I used 3 different shades of rust brown ranging from dark reddish to medium brown. For deck surfaces I used field gray to add the greenish tint, and mixed in darker rusts before the paint was dry, then dry brushed lighter shades of brown after it dried.
The colors seen on wrecks depends on the lighting source. Greenish tints don't reflect so much on what the actual color was, but rather what the eye perceives under the camera lights. Greens also add a sense of "life" to the ship from an artistic standpoint. Ken Marschall painted the wreck with heavy neutral grays in his early paintings. After diving on Lusitania, he switched to greens and browns since they were more evident and less sterile.
The outer surfaces of the model were likewise dry brushed with more medium browns (rust isn't all that red). For a 1998 version, the surface rust needs to be twice as heavy. The distinction between black and white is visible, but far less pronounced.
You pour your heart and soul and talent into an exquisite sub-assembly. Then another. They look great! You've built 20 grand assemblies in the last few months! Despair! There are 80 more to go, and they all have to be better than the ones you've built!
 |
|
 |
|
 |
|
 |
There is even a pair of shoes to commemorate the final resting position of a victim that I found in the Angus photos. (I needed to put them in)
This model was a featured exhibit at the Titanic Historical Society Convention in April, 1997. In competition at the International Plastic Modelers Society (IPMS) National Convention, it won the People's Choice Award - Best in Show in a field of 2,200 other models from 5 continents, and people only bring their best to the Nationals! Winning the Nationals is a model builder's wildest fantasy. But I had an unfair advantage - the woman that wore those shoes in the Angus photos inspired me to do what I never dreamed I could do.
For me, competition was never a consideration. Why did I do it? My brother thinks I did it because I could. There are lots of people who would LOVE to have a detailed model of Titanic, whole or even as a wreck, but don't have the multitude of needed skills. I have understanding of this legendary ship few others will ever know. As for the success of the model, I hold the belief that if you treat The Lady and her victims with respect, Titanic will come through for you.
Copyright 1997 Roy Mengot